Archive for the ‘How To’ Category

Are you a Mid Century Lamp Lover?

How about those beloved fiberglass shades? To Die For.

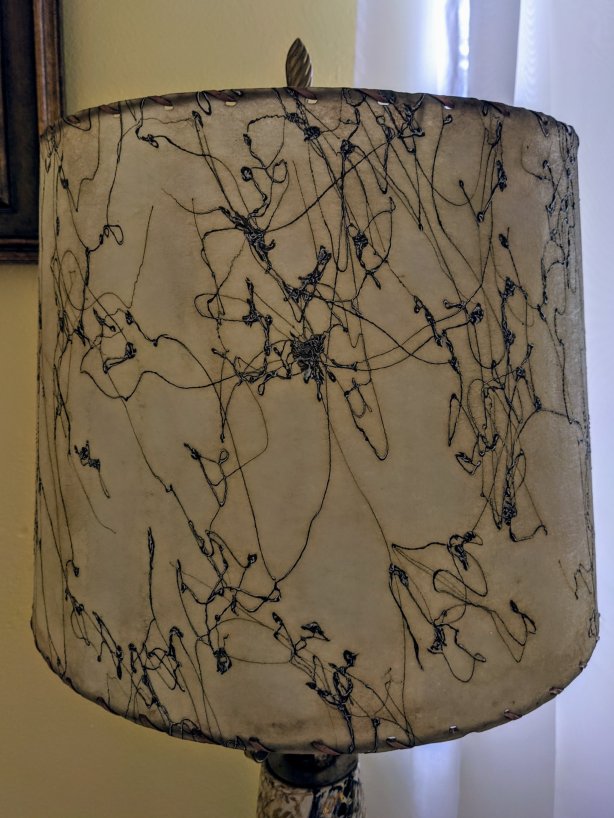
But what about the broken damaged fit for the dump ones?

We must save them.

I’m not a professional lamp shade maker or refinisher or whatever you call people who fix lamp shades.

So those of you who are…move on.

This is Mid Century Fiberglass Lamp Shape Fixing 101.

Also there are different reasons to need to fix. The wire is broken, the strings are broken or the shade is broken. In all of these situations you need Step 1.

Step 1:

Get Gloves and Put Them On. Fiberglass is not a friend to your skin.

Step:

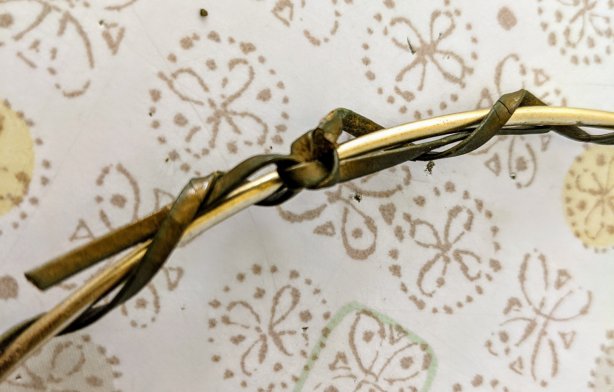
Take Shade Apart. Which is easy. This situation is a broken shade..mostly around string/wire/hole area so I just took shade apart. If not untie knots and unlace.

*Use gloves…seriously.

Step 3:

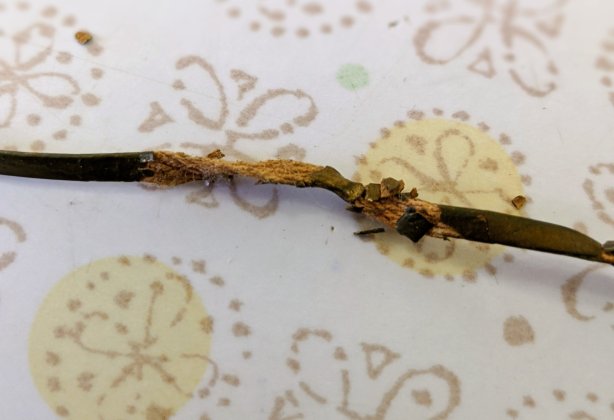
Broken Shade: I cut my shade at the top and bottom where it was damaged.

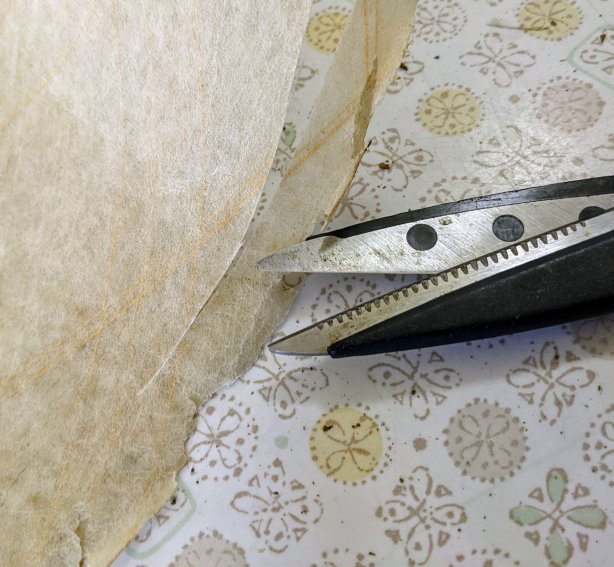
*If the the wire is broken fix with wire or soldering iron. If shade is completely broken use different material…mostly likely a light plastic for stiffness. If the string is damaged get new string. Mine was and decided to use what I had.

Step 4:

Punch Holes in Shade for Re-Lacing. Since this was a spur of the moment fix, again I went with what I had, a regular hole punch. I would go with a smaller hole option if i wasn’t impatient.

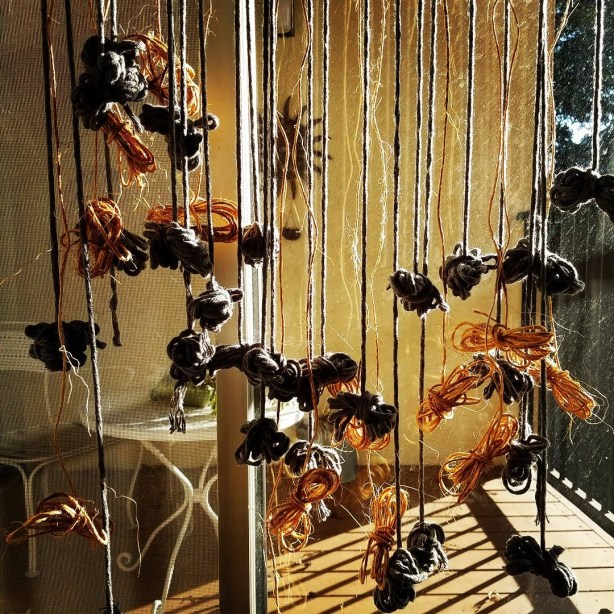
Step 5: Picking String.

I’m a string/twine addict so I had some to choose from. Twine was eliminated first. So I tried these two below. Again I went with what I had because of my excitement of fixing the shade! I probably would have went with a dark leather or synthetic leather if I wasn’t a “get it done now” freak. The dark string in back is the original.

* I like color of the waxed string but felt like it could cut the fiberglass too easy. So I went with the soft, so wrong color, cotton thicker string.
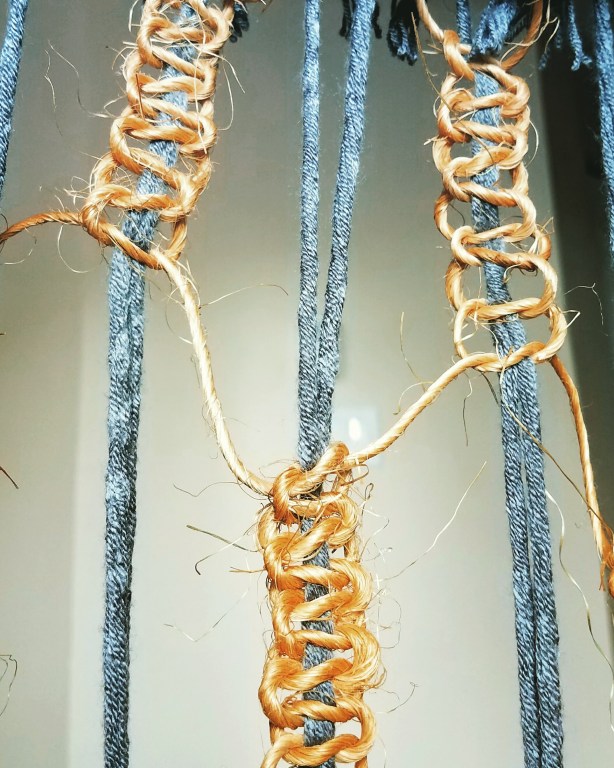
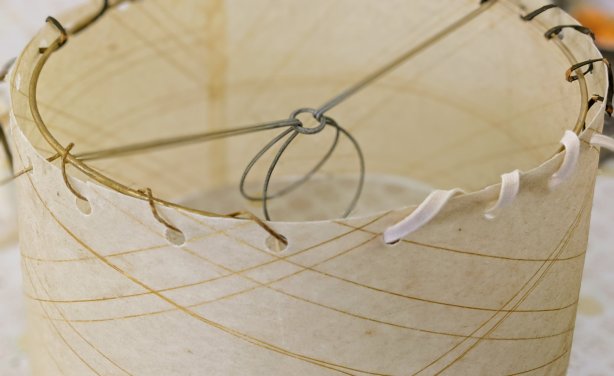
Step 6:

Lace back Up. Slow and steady to make sure “lace’ lays evenly.

*Since I cut my shade from top and bottom, the wire rings did not fit perfectly anymore, but I still pushed forward.

Finished the top and stopped to check my handiwork.

Not bad, eh?

Then I finished with the bottom.

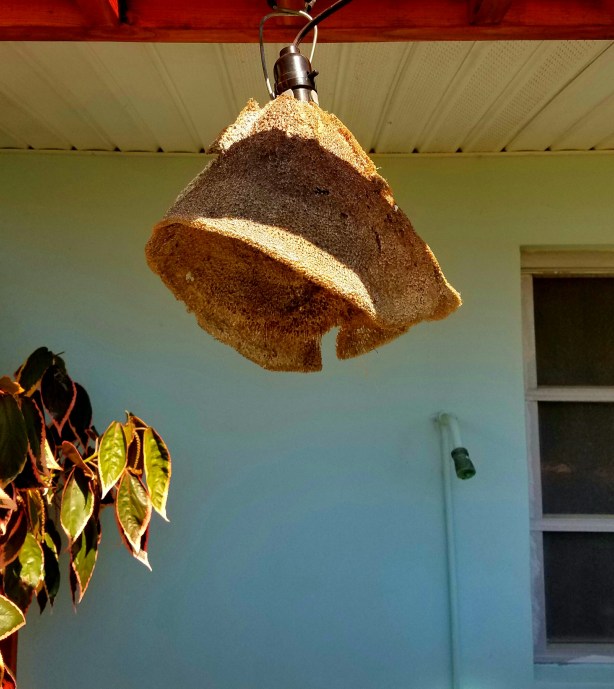
Viola! Saved from the Fiberglass Lamp Shade Graveyard! Not perfect, but still looking pretty!

*If you noticed that my laces are going in two different ways…Damn you and your eye for detail!

No, I noticed I was doing that right away and checked my other lamps. The lacing goes in the same direction on them. But I decided to see what the opposite direction would look like.

**There you have it. In the photo my shade looks a bit crumpled. It is not.

I may go back with different string…but for now there she stays in my foyer.

*And yes, if looks uneven. It may be the way I cut it, or how it’s sitting on the lamp because we all know those shades never sit straight.

Thanks for visiting.

Feel free to ask questions!

Advertisement

I’m a Hard Core Auntie because…

20161020_065648

I Encourage My Nieces and Nephews to Make!  Okay, sometimes I Make them Make!

IMG_1501190073994

But not with cooking or Drawing!

This is my Mirror Identical Twin Nieces Drawing a Picture, Together, at the Same Exact Time.

Isn’t that cool?  (PS…I did not teach them to cook or drawer, but I encourage it.)

I have taught them other Creative Things….

By way of Helping this Aunt Upcycle, Rehab and/or Fix!

2016-10-23 15.07.31

I got these old, Ratty, painted gold Chairs for Free. I thought this would make a Good Learning project for my Brother’s Kids!

20161019_162205

I was surprised, because ALL three, even the 15-year-old brother, got into it!

The took Apart the ratty seats with disintegrated Foam and weakened zig-zag Wire coils.

20161022_151420-1

And with the h=Help of Uncle, they Built the Seats back up Again!

20161023_105139-1

They Added Batting to the new foam, again, with the help of Uncle, and of course, Under my Direction.  I was solely Only the Project Manager on This Remake!

20161022_162911-1

Then the new Upholstery was added to the fixed seats!

But we Were Not Done Yet!

20161022_162920

After a Full, but light Sanding, they spray painted the Chairs!

20161023_141525-1

When Dried, they Put the chairs all back Together again.

They were so Proud of Their own work!!

20161023_141352.jpg

So Proud, I just Gave the Chairs to them to use at Home!

And their Creativity has not Stopped There!

My Brother was Gifted a box of old scratched up 45 Records.

20170604_145741

My 15-year-old Nephew was inspired by Them!

20170604_145812

He added Record Decor Along to his growing broken Skateboard Collection.

20170604_151822

He Came up with this on his Own and I am one Proud Aunt!

And his 12 years Sisters make this Upcycling Aunt Just as Proud!

20170706_095908 (2)

It started with a Curb Alert Free Stuff Pile where I got to Teach my Nieces Picking 101.  Stop the Car. Get Out of the Car. Take a Real Close Look.  My nieces Loved a couple of Wood Boxes in the Pile.  And Of course I eyed a Mid Century-ish Metal Stand or Table Base.

20170706_095908

They put the wire table together with one of the wood boxes and made a table.

20170706_110312

Then they added a Lower Shelf!  Now they have a Bedroom Side Table that Holds their Pet Rat’s, Ink Spot and Einstein, Cage.

And Speaking of Ink Spot and Einstein…

20170730_101112

The Twins looked up Online How to Make a Rat Cage Hammock and They Made one All on Their Own.

Look Close at the Stitching…Isn’t that so Cute.

Then there was this…

DSC_0446

We Took her Camping and she Whittled a little Man and then added the Moss Hair.

Her Idea and Her Work.

I Love seeing the Creativity Grow in Young People and am Fortunate to be Able to see it First Hand in Some of my Nieces and Nephews.  I can’t wait until my next project with them!

Also, I Feel my Very Own Creating Mode Coming Up.                                                                So, Stay Tuned for my Next Creative Blog!

Thanks for Visiting and Do Please Come Again!

Gnome


Mix an Outdoor Shower and a Visiting Sister…

20160822_175434-1 (1)

And you get Motivated to Build an Outdoor Shower Enclosure!

20161215_120759


Our Home, The Gnomad Pad, is in Florida where Outdoor Showering is Quite Nice. This Shower is in a Corner were the Air Con Unit and Near Where We Put Our Garbage Pails so we decided to Hide it all, not only Naked Bodies.

Well, after many discussions between the Hub and I, it was decided that the Fencing Needed to be somewhat Mid Century-ish and there will be an Arbor.  Lots of sketches were made and Pinterest posts were looked at…and finally we agreed upon a Design.

20161215_165328

The Shower area is coming together.

20170303_124635

Fencing is done…but not the Arbor.

IMG_20170307_132154_631

Using the Shower Before it was Done…but the Arbor is Up!

20170310_091703

The Staining Process. I stained the Whole Fence and The Hub did the Arbor.

Okay, He Built 96% of the Entire Thing On His Own!

20170310_115423

It’s Done!!!!  Even with Bougainvillea planted to Climb up the Arbor!

You may notice the far right gate door is darker.  Well, when one goes crazy staining all day without mixing the gallon of stain, the bottom of the can is darker.  What is done is done, but there you go…Do Not Do That.

20170310_115438

The Shower Outside…

20170310_115040

And Inside…Even with a Dedication Sign to My Sister!

IMG_20170309_083359_776

I Did The Shower Floor…And I am Digging it.  Simple Blue Spray Paint, then a Wash of Light Blue Paint Brushed over it.  Rocks, Shells and there You Have it.

Had the Board Laying Around and Just Handed Painted it.   My Sister Loves Mermaids and she is Fighting Cancer, So I Made the Mermaid Bald.  She also has a tattoo of a Starfish because if they Lose Arm, they just Grow One Back which is a Testament of How She has Lived her Life.

Cancer will Not Beat This One.

20170308_111327

One side of the shower is open to this large bush.

20170310_120235

The Very Cleaver Hub Came Up with a Non Rusting Door Latch.  And he Made it with Love.  The Wood Had a Heart on it and he Just had to use that Piece to Go There.

20170310_120143

That Little Blue Dot is how you Unlatch the Door.  So Cute and Cleaver.

And if You Want to Shower After Dark….

20170310_131156

We made a Light out of  a natural Cup Sponge found on the Beaches in the Keys of Southern Florida!

Can’t Wait to See it Being Used for a Mini Family Reunion This Summer!

Homes…

One Step at a Time!  Next is the Back Patio!

20170308_093023

We did Plant these Palms Hopefully to Grow and Block Out the Neighbors Ugly Side Yard and to Block the Neighbor Out too.  All our Neighbors are Great Except this One Person, who Killed Our Orange Tree. See an Earlier Post to Find Out How I Made Lemon-aide out of that Dead Orange Tree at  https://ourownbigworld.com/2014/10/08/passive-aggressive-diy/


20170308_092917

Now We need No Rusting Matching Patio Furniture.  I am Making Sheer Flowy Curtains, but there Needs so Much More Work to Be Done!

Stay Tuned!


RoamingGnomadGraphic

It all Started with a Large Ball of Twine.

And then Some Gray Yarn.

IMG_20170128_131723_027

And Once the Sticks Got Involved…History Was Made.

I have a big wall that needed decor, so I set to making a big piece.

I knew macrame was going to be part of it, but not exactly sure how.

20170128_145957

I attached the twine and yarn and let it all sink in.

20170130_152342

Then I went for it, but I got stuck on what to do after the first row of Macrame.

IMG_20170129_113631_080

It sat like this for quite a while, but the rolled up yarn and twine at the bottom did give me an idea.  But before I could work on that part, I had to finish the other parts.

IMG_20170131_125300_717

So I continued to make these large macrame knots and my sister described the look as “Lace”.

20170223_093917

I kept going with the big square knots and the “lacey” look.  When I finished I added something a bit different.

20170223_144917

Some Poofs made of Twine!

20170223_115940.jpg

I Made a Lot of Poofs!

IMG_20170130_113946_947

And Not just Twine Poofs, but Grey Yarn Poofs as Well!

IMG_20170223_175544_702

I attached the Poofs and Loved them….all of my Pretty Little Poofs.

IMG_20170223_174559_297

I even added one to the Very Top!

20170223_173456_001

And There You Have It…

Poof…MacraLace!

This one is for my Wall, but if you are Interested in Your Very Own Poof…MacraLace, Please Comment Below.

———————————————————————–RSVP-Stamp-6


Okay, Let Me First Say…

I am usually not into revenge, but do like humor and to stand up for myself/home/family/friends/property.

And this is how I Stood Up for my Property…

Passive Aggressively.

Pre-Story (This post is wordier than most of my posts, but I feel I must explain my DIY actions):

We came home one day and found our old orange tree cut down to just the trunk with all the branches laying about the yard.

From RusticPlaceSigns

I asked around and no one knew who did it, until I stopped the next door neighbor driving away.  I , all 5 Foot 3.5 Inches of me, went up to his huge SUV and asked him if he knew who did it.  He got out of his, all 6 + Foot of him, standing right in front of me.  He told me it was him as he walked past me towards The Hub. He told The Hub that his father owned Orange Groves and that he cut it down so it grow back better.  We know nothing of the orange tree, so we said, “Okay.”  Until we found out what this guy has done before to other neighbors.  And the fact that nothing grew back from that tree…still nothing 1.5 years later.

In the above photo, 6+ Foot Tall neighbor’s yellow/brown house is behind the dead orange tree trunk. As you can also see in the photo, he could barely see our orange tree behind other big plants along the property line.

From RusticPlaceSigns

I do believe this man is maybe bi-polar and does not take meds for it because he seems to do this sporadically and manically. I feel for people with any kind of health or psychological issues, but not when my property or people are endangered.

And to let you know how far he has gone, let me tell you other things he has done.

1) Killed plants along the fence of his neighbors on the other side of his property.  They no longer have any plants along that fence line.

2) The old guy who owned our house before us would fall asleep with his TV loudly on.  The cray cray neighbor threw something big (I heard a log) into that bedroom’s sliding glass doors breaking them both. The doors are new there.

3)  We live on a court and another neighbor asked him if she could put a basketball hoop on the line that boarders my yard and his yard.  He has a son that could use it too.  He agreed.  Slowly it moved to in front of our side yard, which was fine and dandy with us.  We still would see him and his son out there playing b-ball.  While we were away he took the hoop and dragged it 1/2 a block to the owners of the hoop and threw it on their driveway.  The woman (a tiny woman mind you) dragged it onto MY driveway.  He then went on our property, took the hoop dragging it back to the owners house and again throwing it back in their driveway breaking it.  This 6+ foot guy got into a verbal fight with a 5 Foot Nothing woman about it, using a lot of curse words.  Cops were called, but that was that.  The cops just told the tiny woman to stay away from him.

4) Our once lush hibiscus plants along our back fence that borders his tiny side yard (the side where you would put your trash cans), are now dying along the top…as if someone threw something over the top of their fence to kill them.  We have done several things to bring them back, and they seem to be having a hard time.  I believe the cray cray neighbor is doing something to them while we are away.  It is a good time of the year for them to be trimmed back, which we are having done by a professional, for them to grown back anew.  We will see.

Everyone is afraid of this guy.

I am not, but I am not going to push it to make it harder on the other neighbors or for him to do more damage to our property.

At first, The Hub and I decided to not cut down the dead orange tree trunk in honor of all the oranges our deranged neighbor aborted, and as protest to what he did to our poor old orange tree.

Then I came up with an idea and this is how I am now PASSIVE AGGRESSIVELY getting back at him…

DIY Style!

I needed this…

From RusticPlaceSigns

Which so happened to be in the Basketball hoop neighbor’s front yard to be picked for free!

I then pulled it apart which used up a lot of aggression and anger!

From RusticPlaceSigns

Then I cut the pieces up which used up even more aggression!

From RusticPlaceSigns

I cut them up into arrow shapes!

From RusticPlaceSigns

Do you Get Where I am Going Yet?

From RusticPlaceSigns

I then pulled out the paint!

From RusticPlaceSigns

I did not paint most of the wood…this one was just a mistake.

But I did write things on the arrow shaped pieces of wood!

From RusticPlaceSigns

Places Where The Hub and I have Lived Together!

From RusticPlaceSigns

With fun extras!

From RusticPlaceSigns

Now, Do You Get Where I am Going with This?

If Not, Here You Go!

From RusticPlaceSigns

There is one extra “Place” and that is all I will say about that!

From RusticPlaceSigns

This if the view from the side yard close to our garage. It is not fully noticeable from the street.

Yet, I feel vindicated.

In one of the photos, you can see our back patio. I noticed from there you only see the back of the signs.

So next step is making signs of places The Hub and I have visited together that we love.

San Francisco and San Blas signs are already made.

Now Need more Pallet!

From RusticPlaceSigns

I do not believe in keeping quiet and ignoring bad things/people.

A good way to fight anger and bad people/things is with love, happiness and humor.

There are times we must be creative on how we stand up!

This is How I Creatively, Funnily, Happily, Lovingly and Passively Aggressively Stand!

Hope it made you smile!

I have made other things from pallets and other old items.

Some of them are for sale as well as vintage/antique old things at Our Own Big World!

———————————————————————————————————————————————————————–
RSVP-Stamp-6

It was the birthday of a new friend…

A new picking/antiquing kind of friend.

We have an eye for similar old things.

So I made her something new from my photos of old things.

A small book of old things.

From 2014 Projects

I first picked the photo, size and then printed them all out!

From 2014 Projects

Cutting them to size was next!

From 2014 Projects

Cutting them included nice pretty corners as well!

From 2014 Projects

I then made the pages of the books.

From 2014 Projects

I attached the photos with double sided thick tape so they stick up a bit from the pages.

From 2014 Projects

I attached all the pages together with cute ribbon, yard and a tiny crown!

From 2014 Projects

And there you have a gift made special for that special someone, new or old, silver or gold!

Some of my photos are framed and for sale at OUR OWN BIG WORLD!

If you see a photo you would like that is not up for sale or you would like a different size,
Please comment here or on the shop.

Happy Day!

—————————————————————————————————————
RSVP-Stamp-6

Summer Loving…

Is a Great Time to Craft!

And Since Summer is Over…

It is a Great Time to Get Back to Blogging, especially since I have not posted crafts in quite a while!

The following projects will have to do with items in the photos from my last past, HOW WE MAKE A HOUSE A HOME OVER AND OVER AGAIN .

I’m feeling frisky, let’s start in the bedroom!

Get your mind out of the gutter, we just needed some storage! I found this, yes without a drawer, for cheap!

From 2014 Projects

I saw it and had an idea which I had to talk The Hub into, as usual.

Sanding came first…

From 2014 Projects

And then the painting!

From 2014 Projects

Have I ever told you, “I don’t like painting.” But it was worth it, especially with my decision to paint this one area red as it goes with the soda crates I am going to use as storage really well!

Next Decision…

From 2014 Projects

What kind of Knobs?

From 2014 Projects

Neither one of those…
Something Completely Different!

From 2014 Projects

My Dresser, craft storage, make-up and hair do-ing area! Done and Done!

Continuing on with the Bedroom…

From 2014 Projects

The Wall Decor!

Although I have no photos to show how I did this…

From 2014 Projects

I am confident that you can take a needlepoint hoop, material and do it yourself!

The interesting thing is that some of the material I designed myself. Oh yes, I did!

You can see how I did this in one of my first posts on this blog at WHO KNEW?

Don’t mind the bikes…
They were part of the decor for a while!

Now on to the kitchen and the ever-changing lights!

From 2014 Projects

I started out with this yoke double light. I just used two small work lights, but took off the pinching attachments.

From 2014 Projects

I wound the wires around the rings for them to blend in and put the wire in the back of the yoke to hide them there as well.

From 2014 Projects

And there you have it!

But then I had more stuff and got creative…
Again!

From 2014 Projects

This is what you do with an old soda shop crate, an old colander, an old dog chain and a light fixture!

From 2014 Projects

Pretty much straight forward…
Put a hole in the colander, put the light fixture through it and then through the crate and line wire along the center chain.

From 2014 Projects

And there have it, once again.

Now, to the front porch!

From 2014 Projects

It all started with this 75 cent table that was falling apart.

Literally, it is made of particle board which was dripping apart slowly!

From 2014 Projects

I used glue, in the form of Modge Podge and an old book to keep it all together. I decoupaged underneath it where it was also falling apart!

From 2014 Projects

And I painted it.
Again with the painting!

From 2014 Projects

It has sat on my front porch for over 4 months and no more falling apart!

From 2014 Projects

“Awwwwesooome,” if I do say some myself!

The table sits in front of another one of my summer loving projects!

From 2014 Projects

And it all started with these…

From 2014 Projects

Which I painted. What is with all this painting?

In the above photo there are pieces of wood in the background which I put across the seats of the chairs.

From 2014 Projects

On top of the slats I placed lots of pillows (yard sale finds). The seating pillows needing hiding…

So I put a vintage 1970 avocado green round table cloth with fringe on them.

I am sure you are interested in why I went that color and style, right?

Well, it is the only thing I found to match this…

From GnomeShackPorch

Which I already had on the front porch!

But, wait…there is more for the porch.

From 2014 Projects

Look What I did to this thing to match the other things.
Oh so Matchy Matchy…

From 2014 Projects

But not too matchy matchy, right?

And here are a few more touches!

Plain ugly rug that The Hub insisted on buying….

From 2014 Projects

Meet Spray Paint and a Stencil!

From 2014 Projects

Not sure I love the turn out…
But anything is better than that the original fugley thing!

From 2014 Projects

Oh and Look what I did with the tons of twigs that fall in my yard!

From 2014 Projects

Twig Garland!

And yes, I added a mosquito net to the Porch Lounger! Love it, Right?

And I know you will love this too…

From 2014 Projects

So much cuteness mushed together right next to the front door under the maibox…
What a Greeting!

Have fun making your own stuff…
I hope I motivated and inspired you!

GET OUT THERE AND CREATE!

And just to let you know…
I sell old things and things I make from old things!

If you are interested please visit my shop, OUR OWN BIG WORLD!

—————————————————————————————————————————————

RSVP-Stamp-6

What Do you Do When you Have to Move…

and Need to Downsize Tons?

From RedTable

And No One Wants to Buy your Hoopty 50’s Style Hill Billy Front Porch Picnic Table?

From RedTable

You Fix it Up and Five it to a Young Adult for her First Apartment!

But First, I Had to Access the Situation…

From RedTable

The Top Was Good!

Schwew!

From RedTable

The Trim was Not!

From RedTable

Nor Were a Couple of the Legs!

So I Started with…

From RedTable

Removing All the Trim.

And Then I had to Figure out What to Put There?

From RedTable

But Before that… I Painted all the Wood White.

From RedTable

Looking Good!

Oh Boy, I got Creative with the Trim!

From RedTable

Oh, Yes I Did!

From RedTable

After I Sampled it!

From RedTable

And Decided it Would Work Perfectly!

From RedTable

And It Did!

From RedTable

Around the Corners…

From RedTable

And Close Up!

From RedTable

The Drawer Even Got Purdied-Up!

From RedTable

Tea Time!

From RedTable

It is So Cute, it is Making the Hill Billy Front Porch Look even More Hoopty!

From RedTable

It Looks So Good Now…

You Forgot about the Legs!

From RedTable

Although I just painted them, you could use a wood putty to re-shape them.

Next Time…

When I Have More Time and Less to Do.

Like Pack. Sigh.

To See More Purdy Things, Please Go to:  OUR OWN BIG WORLD!

—————————————————————————————————————————————————————————————————————————————————-

RSVP-Stamp-6

Our bed is now…

That is!

This project has history and of course, chatty me has to tell you about it!

But I will make it fun…

I swear!

It All Started with This:

From Bed Project

Oh, Yes It Did!

The huge white shelves on the right in the garage came with the house when we bought it.

For some reason, the husband, had to tear them down and they were monsters!

Mind you, there now are metal shelves exactly where these used to be? Don’t ask me!

Anyway, they were monsters because each section is at least 7.5″ long and made of at least 1.5″ thick plywood, with little pieces of woods attached to both sides (to place shelves)!

Can you say super heavy and awkward?

From Bed Project

What is worse, the husband would not let the contractor take them away!

So my mind went to work!

What could I do with these???

From Bed Project

Aha! We did not have a bed frame!

So, I decided I could use the Monsters for a Platform Bed Frame!

The husband nixed this idea for almost a year!

From Bed Project

But I finally went forward with my design vision!

From Bed Project

Yes, we are in our 40’s and our bed is now sitting on cement blocks, or should I say…

Cool Industrial style legs!

After cleaning…

I sprayed painted!

From Bed Project

And kept on painting! Those suckers are big, even if I did not have to paint the full sides!

From Bed Project

After painting, had to transport the monsters to the bedroom.

Huff Puff, Ouch, Oooh, Wait, Okay, Got It!

For some reason these monster garage shelves had trim on them, who puts trim on a garage shelf?

From Bed Project

I had to take some trim off (or shall I say, “The husband had to take the trim off), to use it for the end to make for a more finished look.

From Bed Project

I thought those funky little pieces of wood that stick out (which I like to call “nobbies”) would make the Monsters look cool as a Platform Bed Frame.

From Bed Project

And I was right! It does look cool!

From Bed Project

But I have to admit…

The vision of this whole bed was kind of like this:

What I forgot is that we have a box spring!

Which makes ours just, ha, a tad bit higher!

From Bed Project

But I still like it!

There needs to be some tweaking on the end part that sticks out at the end.  Tweaking,  not to be confused with twerking (which by the way that area is perfect for dancing on top of, you know).

In my design mind’s eye, it was supposed to be a seating area, but now we lovingly refer to it as “The Diving Board!”

From Bed Project

Picture this…running through the house, sliding around the corner into the bedroom trying not to lose speed, continuing toward the bed stepping up with one foot up on that end part, giving just the right thrust to DIVE into the bed!

Yes, we really are in our 40s!  And ahem, we have both tested the diving board and my platform bed frame is that strong!

But no, I am thinking a long thin bench style cushion for that area in complimentary colors would make for that nice low seating area I had in mind.

Do you have any other ideas I could do with that area (maybe steps for our aging cat)??

If so send me some suggestions in the comment area please!
I can’t wait to read them!

Okay, I should have made sure the bed looked a bit better for these photos, but you get the point!

PS…Even though the husband was not into this particular design idea, even with the nay saying, he kept on helping out! I now thank him for the trim removal, trim adding, monster lugging and block carrying help he did provide! We are kind of getting good at The GnoMAD PAD team projects! Click here to see our House Number Team Project: PROJECT FOR TWO!

I make other things besides bed frames. If you want to check them out, please visit OUR OWN BIG WORLD!

———————————————————————————————————————————————————

Lately, I have been obsessed with turning this…

From Gnome Garden

Into this:

From Gnome Garden

And I am finally done!

But first I had to turn this…

From Gnome Garden

Into this:

From Gnome Garden

And this..

From Gnome Garden

Into this:

From Gnome Garden

Ha…not so easy!

So here is a photo essay of how I did it!

From Gnome Garden

Block of Wood and Sticks!

From Gnome Garden

The Roof is done!

From Gnome Garden

The walls are almost done…with the help of a glue gun!

From Gnome Garden

Done…from the front!

From Gnome Garden

And from the back!

Next Gnome Home!

From Gnome Garden

Wrapped up a tiny birdhouse in fungus-like paper and cut out a door!

From Gnome Garden

Started on the roof!

From Gnome Garden

Added some moss, fungus and such!

From Gnome Garden

And there you have it!

But…

I’m not done yet!

From Gnome Garden

No gnome garden is complete without a bench!

From Gnome Garden

Or fencing!

From Gnome Garden

Gnomlandia has it all!

From Gnome Garden

Like a Bench looking over a pond!

From Gnome Garden

And Fencing between the pond and the walkway!

From Gnome Garden

A fluffy green patch of moss ground cover in front of one of the gnome homes!

From Gnome Garden

Massive Rock Backdrops behind another gnome home!

From Gnome Garden

I WANT TO GO TO THERE!!!

From Gnome Garden

AND LIVE OUT MY WEE LITTLE LIFE!

From Gnome Garden

Really though, I just hope the whole things stays put and together until my twin niece gnomes get here…

So they give GNOMLANDIA a proper name!

LOVED MAKING GNOMELANDIA!

ACTUALLY I WAS OBSESSED…BUT IN A GOOD WAY!

Although the above items are not for sale, if you want I can make similar ones for you! Please contact me if so!

And…If you want to see more things I make to sell and old things for sale, go to: OUR OWN BIG WORLD!
————————————————————————————————————————————————————————–
RSVP-Stamp-6